Home Decorating Tips

Home Decorating Tips
How to Get Rid of Paint Bubbles & Blisters
Posted on January 20, 2025
Last updated January 7, 2026
Need (or want) to paint a surface for your next project? You must consider these three Ps: Precision, Patience, and Preparedness. After all, you will never truly know the outcome of your project until the paint has been applied and left to dry on the surface.
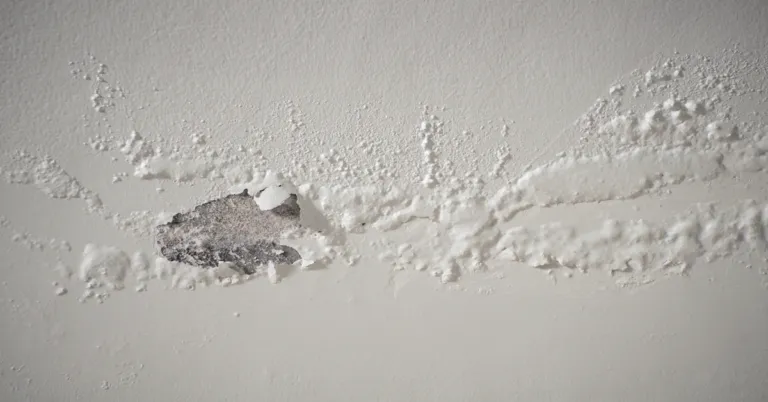
By being more precise, patient, and prepared, you increase the likelihood of your paint job’s success while reducing the risk of unwanted issues, especially paint blisters. These are small pockets or bubbles of air that appear on a painted surface, whether it has been newly painted or not. They form because the paint does not adequately stick to the substrate or the surface underneath it. After some time, paint blisters can deflate or pop on their own, peel, or harden in place as the paint continues to dry.
These paint blisters won’t just cause extra stress because of how unappealing they look on the surface. There’s also the added burden on your wallet on top of extra working hours needed to resolve them immediately.
Blistering paint has been linked to multiple causes, but the good news is, it can be addressed via many solutions. Take a closer look at some of the common causes of paint blisters and what you can do to address them.
Common Causes of Paint Blistering on Wall
Paint blisters stem from the product’s inability to adhere to the wall underneath it. But this begs the question: Why won’t the paint stick in the first place? There are multiple reasons why, namely:
- Increased moisture: This is the most common reason for paint’s inability to adhere to a surface. Moisture that becomes trapped between layers of paint can form air pockets, particularly in the spot where the paint is released from the surface. Some of the factors that increase moisture on a surface include poorly constructed drywall, leaks, external cracks, or even failure to wait for wet paint to dry before applying another coat. These issues must be addressed before you attempt to paint or apply products to the surface.
- Hot temperatures: According to industry experts, environments that reach 29 degrees Celsius (85 degrees Fahrenheit) and above may cause paint to dry unevenly and lead to paint blisters.
- Dirty walls or surfaces: Leftover grease and dirt that was not properly cleaned won’t just make a surface greasy but potentially cause paint bubbles or blisters along the way.
- Failure to apply primer: There are many reasons why industry experts suggest using a primer for paint jobs. This product allows the paint to evenly adhere to the surface and reduces the risk for air pockets that cause blisters.
- Non-compatibility of certain paints: This mainly occurs when you apply another type of paint above an existing layer that is not “compatible” with it. For example, oil- and latex-based paints. These types of paints cannot be applied one after the other since their main compounds do not bind and can cause paint bubbles to appear.
- Overmixing paint: While it is important to thoroughly stir your paint before applying, going overboard can lead to the formation of air bubbles that can make its presence felt on the surfaces.
- Use of the wrong type of roller cover: This increases the likelihood of uneven paint application and the presence of leftover lint or fibers. As a result, the paint will look uneven on the surface and have the potential to blister.
How to Solve and Get Rid of Blisters on Painted Walls
There are many ways to get rid of and reduce the chances of paint blisters. All it takes is willingness to put in the work considering the multiple steps involved. Here are some of the ways you can address and prevent these pesky blisters from appearing in the first place:
- Identify the cause of paint blisters to get to the solution. This serves as the “jump-off” point for the next steps you will be undertaking. Put on your detective hat and inspect the surface and its surroundings to find out why paint blisters appeared in the first place.
If there is a leaky water pipe, have it fixed ASAP. If excess humidity and moisture are to blame, place a fan or a dehumidifier near the area where you intend to work, especially once the paint needs to dry. You can also plan your painting schedule and work on a day when it is not very humid.
Once you have determined the root cause of the paint blisters, you can then begin to remove the damaged paint, clean and prepare the surface, and apply new paint on the affected area. - Clean the surface for a new layer of paint. It doesn’t matter whether you are working with an old or new surface — a clean base is essential if you want your paint job to become successful and long-lasting. For surface prep, wash the surface with a combination of soap and water and thoroughly dry with a rag afterward.
- Monitor the temperature of the environment you are working in. Painting on days when temperatures are cooler is one way to prevent paint blisters. Some industry experts recommend painting in temperatures ranging from 10 to 29 degrees Celsius (50 to 85 degrees Fahrenheit).
- Be ready with the right roller cover. Make sure to choose a roller cover that will suit both the surface you are working on and the type of paint you will be using. For smooth or semi-smooth surfaces, use a foam or a short nap roller cover. If you are working on slightly rough or rough surfaces, go for a medium nap roller cover or long nap roller cover, respectively.
Making an effort to know the surface you are working on and the paint you are handling can guarantee a smooth and even application.
- Use a high-quality primer. This can help cover up unremovable stains, ensure a surface (especially if it is porous) is ready for application, and promote ideal paint adherence. Island Premium Paints’ Island Prima Primer 301 White can be used as a primer and a sealer coat on interior and exterior surfaces.
Dealing with paint blisters may seem like a herculean task, but the right tools and sufficient knowledge can help you banish these from your project once and for all. If you need additional information about this particular issue, do not hesitate to contact a trusted industry expert who can help you out.
What’s next after overcoming paint blisters? Endless possibilities to make the resulting space uniquely yours! With Island Premium Paints, gain access to high-quality paint products that can prevent unwanted issues like paint blisters, and that will help make your home stand out.
Visit the Island Premium Paints website today and check out various home improvement and decorating tips that can inspire you!
References:
https://www.familyhandyman.com/article/paint-bubbling-how-to-fix/
https://www.bobvila.com/articles/bubbling-paint/
https://waterproofing.com.sg/why-paint-blisters-and-what-to-do-about-it/
Related Articles

Key Tips in Working Black and White Motifs
A color scheme of black and white exudes class and timeless charm. That’s why for some, a black and white look is ...
READ MORE
4 Tips to Remember Before “Doing it Yourself”
When you’re doing it yourself, you don’t really just do it all on your own even though you have no idea where ...
READ MORE

Minimalist Room Paint Ideas and Decor Tips
Gone are the days when elegance meant bold colors, big shapes and well-filled spaces in interior design. Simple can be elegant too. ...
READ MORE
Our Products
Our line of high quality paints and products will give your home or project the vibrancy it needs.
Explore Colors
Ready to explore colorful possibiliies today? View our popular paint colo combination palettes for great color schemes and room design ideas for interior and exteriors.